Filter Buying

Stuart Perry • July 10, 2024

Buying Guide On Gear

Filters for lenses have less of a stage in the play of today's digital photography.
The reason for this is that a lot of photographers are either photographing for post production or prefer their images as pure as is possible inside their camera - unfiltered means uninterrupted.

When it comes to the classic UV filter, most people use these to protect the front of their lenses from possible impact damage especially in the great outdoors where a simple slip or an unseen object hits the front of the lens and shatters it. It happens has happened and will happen. So having a UV filter on the front does help to protect the front focusing lens to a certain extent.

So what are the pros and cons of having a UV filter on the front of the lens?

PROS:
Protects (mostly) the front of the lens from impact, protects from liquids that can crystallize (soft carbonated drinks), helps restore under-contrasted areas burnt out by UV radiation (to which extent, depends on the quality of the UV coating), and finally increase the depth of black areas and hardens grey areas a little.

CONS:
Because UV filters increase the depth of black areas and hardens grey areas a little, when using indoors or in low lighting you will lose details in the darker areas. Basically it cuts down the dynamic range of deeper darker colours. Also because you are placing a second piece of glass at the front of the lens this can cause some artifacts to occur in your photographs - aberration, refracted light - really bad for long exposures, subtle softening, vignetting of the corners on wide angle lenses.

So why is it we at Saneal Cameras always recommend that you add a UV filter to your lens purchase?
We have seen so many scratched and broken front focus glass on lenses that we prefer our customers to protect their lenses first and foremost. It is better for them in general. It also adds a touch of security so to speak.

But heres a thing, if you spend $2000 on a lens and then throw the cheapest of filters onto the front then there is a chance you will degrade the image quality. So always use top of the range filters for your top of the range lens.

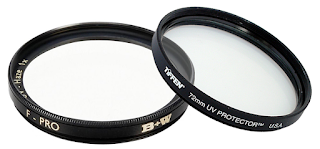
We usually recommend B+W (Ralph Schneider Glass) for the more expensive lenses, and Tiffen for the normal or cheaper lenses, though we do have several other companies that run at a cheaper cost either way.
It has to be said that you do get what you pay for when it comes to both quality and contrast recovery.
So if you value yours lens, give it the best you can afford.

TIP for UV filter users is to keep the filter as clean as possible at all times, so do carry a lint free cloth with you. Also make sure your lens is actually clean before you mount any filter.

So whats your thoughts on the use of UV filters and have they helped at any time to protect your lens? If so we would love to hear your story and or experiences.

Please leave a comment below and don't forget to like and subscribe.

Lens punking banner featuring many camera lens and
By Stuart Perry July 10, 2024
What is Punking?
A group of people are crossing a city street in the snow
By Stuart Perry July 10, 2024
What is Street Photography?
A close up of the inside of a camera lens.
By Stuart Perry July 10, 2024
What the f is aperture?
A woman is holding a poster calendar on a clipboard for January
By Stuart Perry July 10, 2024
The Daily Challenge
A woman is getting her makeup done in front of a ring light.
By Stuart Perry July 10, 2024
The Vlogger Set up In our world of online celebrity and specialist video content providers: there has been more and more attraction towards a personal video camera set-up at home (or work); be that for youtube or twitch and other likened sites. We often get people asking us about what they need to set up and usually after a 5 minute conversation nearly everyone we have spoken to requires the same basics. I use the word basics as you can go as deep into online streaming or video creation as you want to go. There is plenty of free video editors out there be them packaged already with laptop/computer purchases, but a good one to get you going if you don’t have one is the Open-Shot Video Editor. It is simple, easy to use, and has a plenty of tutorials for it online. Yes it is very limited but at least you are getting your content out. So to begin with you have to ask yourself are you streaming or are you producing content to be edited together? For streaming it is always best to get an actual video camera. Yes there are plenty of so called web cams out there but the options that come with those cameras are somewhat limited. If you purchase an actual video camera such as the Sony HDR-CX900 or the Sony FDR-AX53 you will get clearer streaming video, and the ability to adjust zoom to a greater extent than PC video cams or a laptop cam can. Remember, clarity will keep your audience attentive. There is nothing worse than pixelated streamed video. Simply put pixel artifacts are annoying. So stay with a dedicated video camera to get the best pleasing results. When it comes to content for youtube or other online sharing platforms then usually most people are editing many small series of video footage (usually between 5-30 seconds) and splicing them together on an editing platform. So for this way of doing things the camera options are a lot more. The basic fact is that any camera that can do full HD video will do. But saying that: for better more practical results it is better to have a modular system. Be that from Nikon, Canon, Sony, Panasonic or even Olympus. The mirrorless systems are always going to be a better choice for video, as mirrorless cameras do not get as hot as their DSLR brethren when doing video(mostly). This usually means: less heat equals less visual noise so better quality video. Our recommended camera set ups are often within the budget of the creator. But to begin with you don’t need to spend more than a $1000 on the whole setup. So in this sense the Sony A6000 , or the Panasonic G7 are more than enough to begin with. It is all about the lens you use and the lights that you have. For the lens, if you have a stationary set-up then its best to go with a focal length of anywhere between 50mm-85mm anything between those lengths are fine as there is very little to no distortion if a person comes close to the lens. Prime lenses which are lenses that use a single focal length are always better quality, with a narrower depth of field, and give a better representation of the scene. You could use packaged kit lenses if you wish to keep it on a low low budget but it is recommended to have at least one prime lens. Lighting also plays an important part based on how you wish to best represent you and your scene. Near field lighting panels such as the Vid-pro LCD lighting panels (Z-96 and LED300) are more than enough light for most Casters and Presenters. They are near field though, so if you need something a little more light-flooding as such do look at the larger studio panels again from vid-pro such as the LED604 or LED1X1 panels. For the microphone never use the on-board mics on any camera. They are the worst mics ever. They have very small frequency ranges and pick up everything in the near space around and on the camera; they also tend to have a high noise floor which means a lot of HISS noise (white noise) to get rid of in post production. A dedicated Mic is always going to be better quality and much more a clear audio support for your video. (you can have the best video in the world but if the audio is bad then the viewer wont stay with you). Again just like the camera you do not need to spend a great deal on a good mic. A few options are Zoom H1 , Zoom H2N or any RØDE camera mic will be adequate. You really do not need more than that to begin with. A TIP:- Always treat your audio independently rather than use video software to do it. A dedicated Audio editor is going to give you better results, such as the free to download Audacity which has everything you need to adjust your audio to however you want. There after everything else needed for your set up is completely subjective but you could add backdrops, reflectors, different lenses, twin mics for more dynamic range and stereo masking, multiple cameras for one shot multi views and much much more. This blog has been about a simple, straight forward, no more than a $1000 to spend set-up for anyone wanting to either create, or stream their content to the world. We hope this concise blog piece has helped you and if you need more information and have questions please visit us at any of our locations for Vlogger / Tuber creator tips and gear.
A canon camera is sitting on a tripod
By Stuart Perry July 10, 2024
This week has been a very busy week for the camera industry with several new items announced.
A picture of Stephen Oliphant from October 2019
By Stephen Oliphant July 8, 2024
Stephen Oliphant has worked with Saneal cameras for many many years. He is an avid wild life and landscape photographer. Most of his free time is spent running to various bird sanctuaries and migration paths in and around Alberta. His gear does change but is currently running with a few canon DSLRs and an Olympus E-M5 mk II.
A person is sitting in front of a computer screen with the time 6:55 on it
By Stuart Perry July 8, 2024
The following lists are comprised of useful software that are free and useful for most photographers, videographers and content creators. Please keep this page bookmarked as I will be adding more websites to the various lists below as and when I come across more. Feel free to send us your suggestions too.
A grey and brown manfrotto bag is shown in closeup
By Stuart Perry July 5, 2024
I have to confess, I physically have more bags than I do shoes. I have a bag for trekking, a bag for streeting, a bag for urban hiking, a large storage bag, small sling bags and a holster bag. Why so many? Having the right bag in hand when out shooting makes the experience a little more comfortable. Too big a bag and you're lugging weight you don't need, (some stores have you leave the large bag with customer service or with sales staff - risking your gear in someone elses hand...errrr No never not happening). Too small and you're having issues with stowing gear quickly if you need to and you are having to selectively choose the RIGHT lens for the day's outings otherwise you'll be regretting that you didn't bring the X or Y or Z lens etc.Having a main bag at home is sensible, it means you can store all your gear in one place away from dirt, dust, pokey fingers or curious claws.
A bunch of camera lenses are on a white surface
By Stuart Perry: 1402 11th avenue SW location. July 5, 2024
Below you can find a list of common acronyms and abbreviations used in photography. Over the (digital) years it has been found that some influential persons have photography acronyms misunderstood or has been mis-taught to them and then they themselves do teach repetitiously to others without having corrected the initial misguided information or are not knowing that the information is incorrect. For example: The meaning of "ISO" is the most common one heard in the photography circles, so many times we hear individuals state that the ISO in a camera is named after a Greek Goddess of light. Though an amazing coincidence and makes for a smiley story this is very far from the truth and is the result of persons associating one thing with another and then re-representing that packaged idea as an actual fact. To clarify by example: Just because two items are blue in colour doesn't mean they are the same thing or come from the same source.  The above is an example of what has been done so often in photography: individuals who teach in classrooms or on-line (mainly) such as youtube etc, and have not researched correctly some of the basics and in doing so, repeat verbatim what was told/taught to them without any correction. So to avoid those easy urban-myth traps the following is what the most common terms mean. BTW: I have avoided a lot of the least common acronyms or abbreviations because the list would be too big for casual reading.